Some Basics
We all intuitively know what Aviation Navigation means—it means knowing where you are, where you want to go, and having a good idea of how much time and fuel it will take to get there. Navigation means finding your way.
The two most fundamental methods of finding your way in an airplane are pilotage—the identification of present position and direction of flight by seeing features on the ground, and Dead Reckoning.
Dead Reckoning—an intriguing title. I was once told that the name stems from "You're Dead if you don't Reckon properly," but I think they were pulling my leg.
Dead reckoning is the navigation procedure to plot and fly (in this case) a course based solely on mathematical calculations.
UPDATE! UPDATE! Many Flight Simmers took pity on my pathetic lack of knowledge and patiently explained to me the origins of "Dead Reckoning." Here is one:
"I have spent many (more than I care to count) years navigating sailboats all over the place. In the books that I learned from, it was referred to as 'ded. reckoning,' which stands for deduced reckoning as opposed to using true fixes."... thanks, dg.
Dead Reckoning and Pilotage are so interdependent, though, that they are essentially one method. Ask a pilot how he intends to navigate to his destination, and if he says "by Dead Reckoning," one knows that he also intends to look out the window at the ground features to check his progress.
Neither Pilotage nor Dead Reckoning require assistance from electronic aids to navigation, thank you very much. If the weather is good, and it's daytime, and you can see the ground at all times, Pilotage can be very satisfactory. But change any one of those variables and the excitement level can quickly escalate beyond what a mortal cares to handle.
Dead Reckoning, on the other hand, is a satisfactory navigation procedure whether you can see the ground or not. After all, both Charles Lindbergh and Amelia Earhart soloed across the Atlantic navigating with Dead Reckoning.
Three properly-performed actions are necessary for dead reckoning navigation to get you to your destination, at the estimated time of arrival:
- The pilot must properly calculate the course and fuel consumption.
- The pilot must accurately fly the aircraft
- The weather service must correctly predict the winds-aloft.
Omitted is "Put enough fuel in the tanks for the journey, and then some." That slight oversight has ruined more than one perfectly-navigated flight. Few will argue that if the aircraft is running low on fuel, the fuel indicator becomes the most fascinating gauge on the panel. Yes, indeed, it does.
The first two items in the list are under the pilot's control and most pilots have the good sense to do them right. The third criteria is the one that notches up the interest level. Winds-aloft predictions are seldom accurate, and may never be. Sometimes the miss is huge. No big deal, though, if you can see the ground, have chart in hand, and it is properly oriented to follow your flight. You simply adjust for the wind based on landmarks spotted below.
Assume that your estimated course was to take you directly over the power company with its 100-ft. tall smoke stacks. But there it is a mile or so to your left, its plume of white smoke laying down horizontally blowing towards you. Obviously, you must turn left some few degrees to get back on course plus make a heading correction once back on course to accommodate those strong winds.
After returning to course you check the next landmark to see how good your heading correction was, and so on for each landmark, until you reach your destination. Very simple in theory.
There is nothing inherently inaccurate about dead reckoning; it is limited only by the information provided. Dead reckoning is, in fact, the basis of all navigation.
Longitude and Latitude
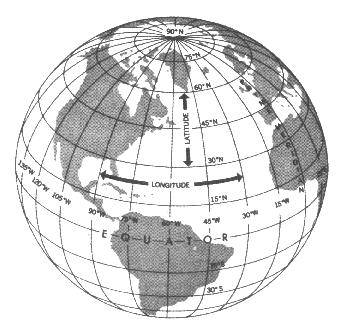
Meridians of longitude are drawn from the North Pole to the South Pole and are at right angles to the equator. The "Prime Meridian" which passes through Greenwich, England, is used as the zero line from which measurements are made in degrees east and west to 180°.
Any specific geographical point can thus be located by reference to its longitude and latitude.
From the earliest days, determining latitude was relatively simple; measure the height of the sun with a sextant. Longitude was a different matter. Greenwich Observatory was set up by King Charles II in 1675 to study means of fixing longitude, and the observatory became the acknowledged world authority on the subject. The telescopes and other instruments there determined the exact position of the meridian, and in 1884 an international conference in Washington agreed that Greenwich should be sited at zero longitude
By using meridians, direction from one point to another can be measured in degrees, in a clockwise direction from true north. Draw a course line on a chart and measure the angle which this line forms with a meridian.
When moving north or south by one degree of latitude, the distance remains approximately the same whether the observer is at the equator or in London, New York, Tokyo, or Sydney. That number would be unchanged vs. latitude if the earth were a perfect sphere, which it isn't. The earth is somewhat flattened at the poles.
The distance situation is quite different when moving east or west.
Note the convergence of the meridian lines at the poles. Thus moving east one degree at the equator is a greater distance in feet or meters than moving one degree east in London, New York, Tokyo, or Sydney.
Nautical Miles and Knots
The circumference of the earth is divided into 360°. Each degree is further divided into 60 minutes. If you move one minute east or west on the equator, you have gone one nautical mile. Thus a nautical mile is the circumference of the earth divided by 360, giving the distance in one degree, and that is further divided by sixty for the distance in one minute of arc.
Earliest estimates of the earth's diameter was 18,000 statute miles. As methods of measurement improved over the years, the earth's circumference "increased" to 24,901.55 statute miles. Hence the distance of a nautical mile similarly increased with time, too. What a nightmare that must have been for cartographers and navigators.
Regardless of calculations of the earth's circumference, the nautical mile has been standardized at 6076.113 feet, plus another gazillion decimals. One nm = 1.15 statute miles for the purposes of estimating. Again, there are a gazillion decimals in the actual conversion. Using 1.15 will not fly you into a mountain.
There is a lot of lore behind the knot ... tying knots into lines and clocking the time for each to pass a sailing ship, etc. Suffice it to say that a knot is one nautical mile per hour and hence is 1.15 statute miles per hour.
Two further subjects should be understood before going on to charts.
VFR vs. IFR
The first is VFR weather vs. IFR weather. If the weather is "good," which the FAA defines as a visibility of at least three statute miles and that you can maintain at least 500 ft. clearance from the clouds above you, then you may fly by Visual Flight Rules. Flying at VFR minimums is not very comfortable and you better know where those 1000 ft. TV towers are, because you'll never see them in time to avoid them. They are marked on your charts.
In practical terms, VFR is 3 miles visibility and 1000 ft. ceiling, because the minimum altitude one can fly in an uncongested area is 500 ft. above the surface. But that minimum altitude increases to 1000 ft. above obstacles near cities. So, if you depart VFR from Podunk Hollow Airport, with reported ceilings of 1200 ft., you're not going to be legal with that ceiling flying above New York City with all of its skyscrapers reaching for your landing gear.
VFR flight requires more than just staying clear of the clouds by 500 ft.
Courtesy of and copyright Mark Gross and Trade-A-Plane, Crossville, TN.
Pilots must fly by Instrument Flight Rules, or IFR, if the weather is below VFR minimums, or if they are in Class A airspace, which is anything above 18,000 ft. MSL. A pilot must be instrument rated to fly IFR, which requires passing a written test plus demonstrating the ability to safely fly and land the aircraft solely by reference to the instruments.
Before an IFR flight, an IFR flight plan must be filed with Air Traffic Control (ATC) and it must be approved. Normally ATC personnel read back the approved flight-plan shortly before departure. It can be brief and pleasant, such as "Approved as Filed," or, still brief, but less pleasant such as "Approved as Filed with the following changes ..." and then they completely modify your routing.
Pilots may file an IFR flight plan no matter what the weather. There are times when it is prudent to file IFR even in VFR weather. For instance, it might be wise to file IFR if one were to fly a small, single-engine plane over a large body of water after dark when the horizon is difficult to discern. Not supposed to file IFR though if you're not IFR rated.
All U.S. commercial airliners file IFR for every flight.
Flight Altitudes
The second subject worth mentioning is flight altitude. A pilot doesn't hob-nob about in airspace at whatever altitude most eases his lumbago. The FAA has a set of rules for flight altitude. And, wouldn't you know, there is one set of rules for VFR flight and a slightly different set of rules for IFR flight. So here goes. In a moment you'll learn an easy way to remember these rules.
If your VFR flight is above 3000 ft. AGL (Above Ground Level) when flying a magnetic course of 0° to 179° fly at ODD thousands of feet plus 500 feet. In non-gov't. language, fly at 3500 ft. or 5500 ft., or 7500 ft. and so forth if your magnetic course is from 0° to 179°.
And of course, from 180° to 359° magnetic course, your altitude should be EVEN thousands plus 500 ft.—like 4500 ft., 6500 ft., 8500 ft., etc.
How does one remember that rule? It's easy. "Easterners are Odd" will do it. If your VFR course is easterly, i.e., from 0° to 179° fly at odd thousands plus 500 ft.
If one leg of your flight is easterly and you are at 5500 ft., and the next leg is to the northwest, need you change your altitude to adhere to the rule? You sure do.
Notice that the term "magnetic course" has been carefully used throughout this altitude discussion. With a crosswind, the aircraft's magnetic heading will differ from the planned magnetic course.
VFR flight altitudes vs. magnetic course, above 3000 ft.
For example, suppose your planned magnetic course home from a weekend at the racetrack is 005°. But a strong crosswind forces you to steer 355°. Your altitude will be determined by the magnetic course of 005°, i.e., follow the easterly rule to choose your altitude.
How does IFR differ? Forget the "plus 500 ft" adder. So from 180° to 359° on your IFR flight, fly at 4000 ft., 6000 ft., 8000 ft., etc. All of this is a moot point on IFR, though, because ATC assigns your altitude, at which you are obligated to fly even if it violates this altitude rule.
Not to worry, though, ATC won't assign your Cessna 172 to 17,000 feet. The IFR flight plan that you filed includes your aircraft type, and since computers never make mistakes ...
The pilot must set the aircraft's altimeter to the local barometric pressure or else it will not show the correct altitude, which is vital to know when near the ground.
Rules, Rules and more Rules. To further complicate the airspace issue, in the U.S. the FAA has designated six classes of airspace; Class A, B, C, D, E, and G. A chapter would be required to explain each class, and will not be attempted here. It's enough to remember that a pilot must be in contact with ATC to fly in Class A, B, C, or D airspace.
Sectional charts show the location of each type of airspace and the altitude limits for each class. For those interested in more information, borrow an Aeronautical Information Manual (AIM) from your local library.
At 18,000 feet and above, pilots no longer need worry about local barometric pressures. They uniformly set their altimeters to 29.92 in. Hg. and adhere to the altimeter reading regardless of the actual barometric pressure.
Also, from 18,000 feet and above, the term Flight Level is used, rather than actual altitude. Drop the last two zeros of the altitude for the Flight Level. Thus, 24,000 feet becomes Flight Level 240, written FL240, and spoken Flight Level Two-Four-Zero.
Compass Errors
A compass is one of the pilot's dearest friends, if not always one of his or her "truest" friends. There are times when a pilot must wonder whether a compass is working for him or against him.
The wily compass can find so many ways to lie to a pilot. It's readings will be wrong, if:
- the aircraft is turning—it can even swing in the opposite direction of the turn!
- the aircraft is climbing or descending.
- the aircraft is accelerating or decelerating.
- the aircraft is flying through rough air.
- there are metallic objects near the compass.
- the radios are turned on vs. turned off.
The bottom line is that a pilot can only rely on the compass when the aircraft is in smooth air and flying straight and level. Due to its potential for errors, the magnetic compass is normally used as a backup source of heading information.
The Directional Gyro, more frequently called the DG, provides reliable heading information even in the event of the first four conditions in the list above. For this reason pilots use it as their primary heading indicator. A DG may be electrical-powered or vacuum-powered. In either case, loss of its source of power results in a non-operating DG.
Some call the DG a gyro-stabilized compass. It isn't. It's not a compass at all. It is a gyro-stabilized heading indicator. Before a flight, the pilot must set the DG heading to match the aircraft's compass reading.
The DG does not display accurate heading information for a limitless period of time. Because of "precession," the DG should be checked against the compass about once every fifteen minutes, and its heading indicator reset if necessary.
A compass correction card is the solution for the last two items in the list. A technician manually calibrates the aircraft compass in 30° increments around a circle. He then enters the corrected compass headings on a compass correction card which is then mounted on the aircraft's panel.
| FOR (MH) | 0° | 30° | 60° | 90° | 120° | 150° |
| STEER(CH) | 359° | 30° | 60° | 88° | 120° | 152° |
| FOR (MH) | 180° | 210° | 240° | 270° | 300° | 330° |
| STEER (CH) | 183° | 212° | 240° | 268° | 300° | 329° |
This compass requires the greatest correction when the aircraft is on a southerly heading. To track the 180° magnetic course, the pilot must steer a 183° compass heading.
Existing versions of Flight Simulator have no provision to incorporate this correction, since their compasses do not have this sort of error in them. Future versions may, though, in their quest to be "as real as it gets."
Magnetic Variation
The most significant "compass error" is variation. The magnetic north pole and the true north pole are at different locations on earth. Variation is the angle between true north and magnetic north. Therefore, a correction must be made to the compass heading to track a true course, or one based on true north. This correction is called variation.
Variation is discussed in the later section, "Plot a Course."
Miscellaneous Stuff
... that didn't seem to fit anywhere else.
- All headings in aviation are given in three digits. So a heading of 15° is referred to as 015°. In communications each digit is always pronounced separately, so this would be zero-one-five degrees.
- Runway headings are always magnetic.
- To determine runway numbers, divide direction of runway by ten and round off. Thus a runway with a 253° orientation would be runway 25; if the orientation were 257°, it would be runway 26.
- Add or subtract 18 from the runway number to get the runway number in the other direction or to determine the downwind leg.
- A due-north heading in aviation is 360°, not 0°, hence the runway 36 at airports.
- When turning right, either the aircraft or plotting a course, add numbers. For example, heading is 083°, turn right 30°, the new heading will be 083° + 30°, or 113°.
Navigation procedures aren't useful if you can't fly
When I first started with Flight Simulator, my most common complaint was "I can't trim this aircraft to maintain altitude." Well, as usual, I was my own worst enemy. It was so much fun flying so many different types of aircraft that I never learned anyone of them very well. Once I decided to concentrate on a single aircraft, the C182, and decided to learn its "numbers," flying became more accurate and enjoyable.
So start out by selecting an aircraft to fly and stick with it. I recommend the C182 Nav Trainer, just mentioned, that can be downloaded from this site. It is a fixed gear, fixed pitch prop plane that is nice and simple to fly when you are learning the fundamentals of navigation.
Then take out pencil and paper and write down the power settings for the following configurations:
- Straight and level cruise at 125 kts.
- Descend at 500 fpm, 125 kts.
- Climb at 500 fpm, 100 kts.
Keep the paper nearby with these reference power settings written on it and refer to it whenever you change configuration.
Practice, Practice, Practice
This is a simple practice session incorporating airspeed control, level turns, descents and climbs. Fly the practice pattern with the FS-98 visibility and ceiling set to minimums so that you have only the instruments for reference. All later flight maneuvers will be simple once you have mastered this pattern.
Seven minutes is all it takes to fly this practice pattern.
It's easiest to fly this practice pattern if you first click here to download the picture and flight instructions.
Begin the flight at 1000 ft AGL, then:
- Slow to approach airspeed, and fly straight and level for one minute.
- Begin a descent for one minute at approach airspeed and a 500-fpm rate of descent.
- Level off at 500 ft, and fly one minute at approach airspeed.
- Make a level, standard-rate turn. Remember that a standard-rate turn is 3 degrees per second. Make this turn for one minute, which should result in a turn of 180 degrees.
- Climb for one minute at climb airspeed and a 500-fpm rate of climb.
- Here you should be at your initial 1000 ft altitude. At this point, accelerate to cruise airspeed and cruise power.
- Make a standard-rate level turn for one minute, rolling out on your initial heading.
When you fly this pattern the second time, make the turns in the opposite direction, and alternate the directions of the turns from then on.
Although the Nav Trainer is a fixed-gear plane, the description below mentions gear settings so that it can be followed when you transition to a high-performance aircraft. Ignore those references with the C182.
During the descent segment—B—you should use as many different aircraft configurations as you can. In other words, make one simulated approach in the clean configuration, using only power to adjust the rate of descent. Then, make a descent by lowering the gear, adjusting power as necessary to maintain a 500-fpm descent. Finally, use various flap settings, with and without the gear, paying attention to the specific pitch attitude and the approximate power setting needed for each type of descent. This sounds complicated, but the variations are only for one segment, B.
Next, fly the level turn segment—D—with the gear down and the flaps in the clean and the proper maneuvering position. No matter what configuration you are using in segment D, you have to remember to clean up the aircraft—raise the flaps and gear—when you begin the climb in segment E.
Learn the C182 Nav Trainer thoroughly. Practice this pattern once a day until controlling the aircraft becomes second nature, which will happen sooner than you think.
Practice until:
- You can change the gear and flap configurations without gaining or losing any altitude.
- The airspeed remains nailed where you want it.
- One minute of descent results in a loss of exactly 500 feet, one minute of climb results in a gain of exactly 500 feet, and the one-minute turns come out to exactly 180 degrees.
That's plenty of background with an excellent practice flight session. With all of this that as a background, let's move on to charts. The VFR chart will be first. Get to its description by clicking on the VFR Charts button below.
Site best viewed at 600 × 800 resolution or higher.
© 1999 – 2002, Charles Wood.