Supplies
You'll maximize the return from this tutorial if you purchase or borrow three inexpensive items. They are:
- A "New York" Sectional Chart. Many of the practice flights take place in the area covered by that chart. The Sectional Chart is fully explained in the section titled "VFR Charts."
- An IFR Enroute Low Altitude Chart. You'll want Chart L–25/L–26. IFR stands for Instrument Flight Rules and broadly covers flying in poor weather conditions. More on this in the IFR Charts Section.
- A plotter to draw courses on the Sectional Chart and to determine the true course and distance to fly from point A to point B. This is described below.
These items are all available either from your local airport at the general aviation terminal, or through the Internet. Enter "pilot supplies" into your search engine to find them on the Internet.
Lastly, get a three-ring binder. A lot of material will be printed out in the course of the instruction, and your flight deck will become a hopeless clutter if you don't have a reliable method to organize all of that paper. Note: This advice falls under the category of do-as-I-say, not do-as-I-do. I am an unsurpassed expert on clutter.
Sectional Charts
When the federal government undertook the responsibility in 1930 to provide aviation charts, they divided the then-48 states into 37 sections for chart-making purposes. Ever since that time those charts have been called Sectional Charts after the section that they mapped. Each chart is named after a large city contained within its coverage area.
A Sectional Chart is used for VFR flight. VFR stands for "Visual Flight Rules" and identifies the weather conditions that a pilot may fly an aircraft based on ability to see ground features and remain clear of clouds. It is euphemistically referred to as "good-weather" flying, but some VFR conditions are downright difficult to fly in without resorting to flying the aircraft by instruments, which requires a separate rating.
Sectional Charts show features that a pilot might see from the air, such as airports, rivers, lakes, power lines, railroad tracks, city outlines, etc. It also shows common routes between Navigation Aids. Typically, these routes are between VOR Navaids, and hence will carry a designation beginning with the letter "V." They are called Victor Airways.
IFR Enroute Low Altitude Charts
The "IFR" charts differ from Sectional Charts, or VFR charts, in their lack of ground features. Airports, of course, are shown, and some very major geographical features such as large rivers, etc. But IFR charts principally provide the sort of navigation information a pilot needs when flying from point A to point B without the ability to see the ground. The pilot flies the aircraft solely by reference to the gauges on the instrument panel.
At first glance, the information on an IFR chart appears confusing. But as you will discover later in this tutorial, interpreting IFR charts is relatively straight-forward.
The IFR Enroute Low Altitude Charts carry the designation "L" followed by a number. This both distinguishes it from Sectional Charts, but also from the High Altitude Charts (above 18,000 ft) used by jetliners, which begin with the letter "H."
Plotter
Before you can plot a course on a sectional, you should buy or borrow a plotter, shown below.
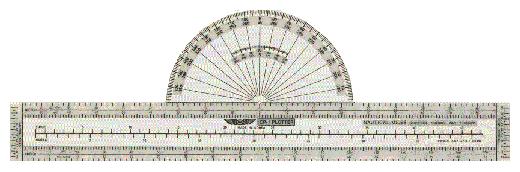
A plotter is a transparent scale with a built-in protractor.
You can do all of your course-planning by filching a protractor and ruler from your son or daughter's bookbag. But that greatly increases the pain of flight planning and increases the probability of error, not to dismiss your child's justifiable ire at school when he or she notices that these items are missing.
A plotter is calibrated on both sides. One side is in nautical miles, and the other side is in statute miles. And more, yet. Each side has two scales: one for sectionals, 1:500,000, and one for world aeronauticals, 1:1,000,000. Hold a plotter in your hand and all becomes clear.
The scale for each side of a plotter is clearly marked, but always check that the correct side is up before measuring any distances. Either side is OK when measuring true course headings.
The specific use of the plotter is discussed in a later section when you plot your first course.
With supplies in hand, it's time to move on to the fundamentals of Navigation. Click on the Air Navigation button below to get to the first section.
Site best viewed at 600 × 800 resolution or higher.
© 1999 – 2008, Charles Wood.