Flying the Glide Slope
Wouldn't it be great to be in this front office?
The five Localizer approaches in the previous section were an excellent beginning to mastering the ILS. That experience, especially if you flew each approach twice, greatly reduces the distraction of tracking the localizer while learning full ILS approaches.
However, you must proficiently accomplish one remaining task before you're ready to fix your eyes on the glide slope needle and descend the slippery slope to the runway.
The standard glide slope for an ILS approach is 3°. To maintain that 3° descent you must know the rate of descent needed for any ground speed, elsewise your ILS approaches will be very unsatisfactory.
Knowing the descent numbers is not enough. You must also be able to accurately maintain the desired rate of descent.
Stay with us and we'll resolve both problems.
First, here are the rates of descent for various ground speeds for a 3° glide slope.
| kts | 55 | 60 | 65 | 70 | 75 | 80 |
| fpm | 292 | 318 | 345 | 371 | 398 | 424 |
| est. | 275 | 300 | 325 | 350 | 375 | 400 |
Note first: the higher the ground speed, the higher the descent rate to stay on the 3° profile.
The fpm row, feet per minute, shows the actual rates of descent needed for various ground speeds appropriate for the C182 Nav Trainer. For example, at 75 kts. ground speed, your aircraft must descend at 398 fpm to remain perfectly aligned with a 3° glide slope.
Well, the 398 fpm number, along with the other rates of descent in that row, show that calculators are alive and well. But few mortals could memorize that row of numbers, let alone recall them when mucking about in the soup just prior to an approach.
It's time for another rule of thumb: Multiply the ground speed, in knots, by five and you will have a usable number for the correct rate of descent, in feet per minute.
Note the row in the table labeled "est." That is the ground speed multiplied by five. Those numbers are a little lower than the actual fpm's needed, but are within about five percent so only a little tweaking will be needed to stay on the glide slope. Furthermore, those numbers keep you on the "high" side of the glide slope, a better place to err than the "low" side.
And that is the key to a good ILS approach: "only a little tweaking is needed."
We've beaten around the bush on this Ground Speed thing. The air speed is not what's of interest in this calculation, it's the ground speed that counts. So if the TAS is 75 kts as it should be for the C182 Nav Trainer on approach, and your headwind component is 15 kts., then ground speed is 75–15 or 60 kts., times five would be a rate of descent of 300 fpm.
Sorry, a lot of words to say that rate of descent equals five times the ground speed.
Practice, Practice, Boring, Boring
Not today. We're going to practice setting and maintaining the proper glide-slope rate of descent by flying the VASI in brilliantly clear VFR weather—at six different airports with only a few keystrokes to move from one airport to another. You jet jockeys flying the big iron can even participate if you promise to keep your fingers, err, ah, mouse, away from the autopilot.
VASI System
Most runways with a published IFR approach are equipped with lights that help pilots determine if they're on the proper descent path during the final stages of approach and landing. The most common system is the VASI, or Visual Approach Slope Indicator.
VASIs come in several varieties, but a typical system includes two sets of light bars placed on the left side of the runway, one nearer the landing threshold than the other. Lenses split the light into red and white beams.
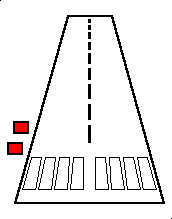
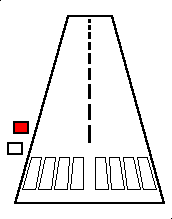
Three combinations of lights exist with this arrangement. If you're approaching the runway on the proper glide path, usually a three-degree slope, you'll see a red light above a white light.
![]()
![]()
![]()
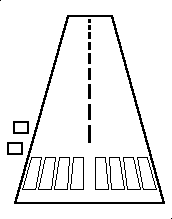
Left, "Red over red, you're dead," approach is low. Center, "Red over white, you're all right," approach is perfect. Right, "White over white, you'll fly all night," approach is high.
Intuitively, of course, one understands that red-red is "danger," or low, and then the others take care of themselves.
Intercepting the Glide Path
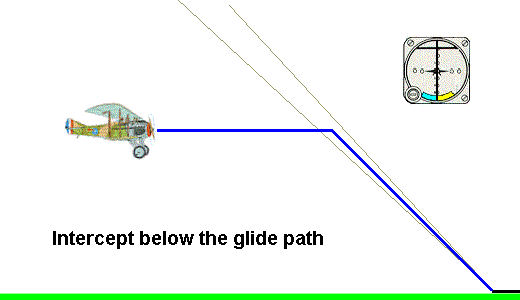
The preferred method to intercept a glide path, whether the ILS Glide Slope or the VASI lights, is from below. Two reasons for this.
Intercepting a glide slope from above involves shifting from the rate of descent used to intercept to the rate of descent to maintain the glide slope. For most that is a more difficult maneuver than flying level and beginning a descent when intercepting the glide slope. Why complicate your life when all you need do otherwise is concentrate your attention on a proper ILS approach?
The glide-slope beam "thickness" is 1.4° but false lobes can exist above the glide path. An aircraft might intercept one of these erroneous signals when intercepting from above, leading it to the runway on an improper glide path.
So do it the easy, error-free way. Fly level, intercept the glide path, then begin and stabilize the rate of descent.
Aiming Point
While VASI lights are a useful aid for controlling the slope to the runway, you must also have an aiming point. The aiming point is the point where the airplane would impact the runway if you don't initiate a flare.
Flight-simmers love the long, straight-in approach. It seems so much simpler than the standard entry into a downwind leg where it's necessary to keep the runway in sight during the turn onto base leg and the turn onto final.
The straight-in approach also eliminates the needless bother of determining entry, downwind and base-leg headings, of determining wind correction angles for each of those headings, and of determining which approach is standard for the desired runway, left-hand or right-hand turns. Gone, too, is the worry of how far away from the runway to fly the downwind leg and when to turn base-leg.
In fact, standard procedure landings, with turns onto base leg and final, are easier than long approaches because everything happens so much closer to the airport where you can see and judge better. It's unfortunate that Flight Simulator viewing limitations discourage pilots from becoming proficient in those fun-type landings.
All of that aside, most IFR landings follow a long, straight-in instrument approach. The aiming-point technique will improve all of your landings, whether long, straight-in approaches, or the standard procedure landings. Once the landing becomes visual it will accurately get you to the threshold of the runway.
Begin by focusing your attention on the threshold end of the runway, an easily discernible point in Flight Simulator. The object is to adjust your rate of descent so that the aiming point does not move during your entire approach to land. It only gets bigger as you get closer.
A china marker pencil will be useful until you have a few landings under your belt using this technique. You'll practice this in the VFR landings with the VASI, but in actual IFR approaches you'll use this technique as soon as the runway becomes visible.
After you begin your descent down the glide-path and everything is fairly stable, pause your FS and mark a line on the monitor beside the approach end of the runway, to emphasize your aiming point. Then continue your approach. The end of the runway must not stray from the line you drew on the screen.
If you have set your rate of descent precisely correct, it will be as if you're suspended in air; there will be no movement of the runway as you approach. It will almost be eerie. Any movement of the approach end of the runway signifies that the point of your actual landing will differ from your point of intended landing. Here are the possibilities:
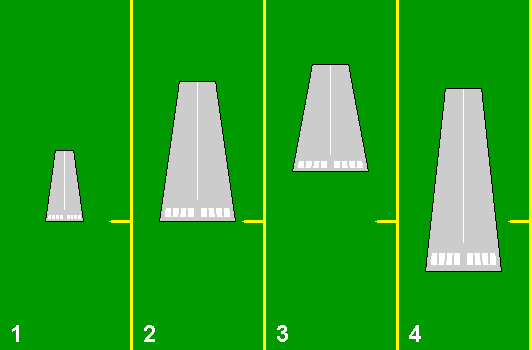
- Aiming point established at yellow mark.
- No movement of the runway threshold as you near the airport. The rate of descent is perfect.
- The runway threshold is creeping up the screen as you approach. The landing will be short, the rate of descent is too high. Pray that there are no schools or hospitals below.
- The runway threshold is creeping down as you approach. The landing will be long, the rate of descent is too low. Pray that no 20-story condos are at the end of the runway.
Once you alert your senses to be aware of any movement of the runway threshold, this becomes a very natural technique to use when landing.
Remember to adjust rate of descent with power, not by changing the position of the yoke. Consider this ancient aviation proverb:
If you want to go up, pull back on the yoke.
If you want to go down, pull back a little more.
If you want to go down real fast and spin around and around and around, just keep pulling back.
Actually, the technique to control rate of descent on the glide slope is controversial. See the discussion on this a little farther down the page.
Why don't I just set the rate of descent with the VSI?
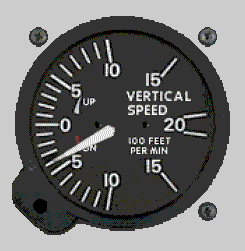
Try this little experiment. Trim your C182 Nav Trainer for straight and level flight, about 100 kts. IAS. The VSI should show zero. Now shove the nose down ten degrees, watch the VSI, then pull the nose ten degrees above the horizon. The VSI needle is all over the place.
The VSI does a good job of reporting stable conditions, straight and level flight or a constant, unvarying climb or descent. But it is of little use while the attitude of the aircraft is changing.
If the VSI has so little value, why put it on the panel?
Didn't say that it was of little value. It is excellent at reporting stable settings, which is what IFR flying is all about. Stable settings.
Holding the Glide Slope—Throttle or Pitch?
Student pilots learn early in their flight training that the throttle controls rate of descent, or climb, while the yoke, or pitch, controls airspeed. Few people argue with that, although there is some interaction between the two controls. But it's a nice simple, nearly fool proof technique.
There are times to do this backwards, though. For example, if one is flying straight and level and the altitude has drifted low by 15 feet, an ease-back on the yoke to regain that small altitude is an appropriate technique.
Midway through this ILS section, I started to get some feedback on holding the glide slope with pitch, or attitude, and airspeed with throttle, rather than the other way around. I went to some experts and the consensus was right down the middle. Half said throttle for rate of descent, the other half said pitch, or yoke.
I got a lot of good information when I posted the question on an aviation newsgroup. Here are my conclusions, taken from many responses.
- Learn the proper power setting to hold the glide slope. The following VASI approaches will help you do just that.
- Intercept and descend down the glide slope, using the throttle to control your rate of descent.
- If you are drifting above the glide slope, very slightly reduce the throttle and note the RPMs that most closely keep you on the glide slope.
- If you are drifting below the glide slope, slightly ease back on the yoke to "quickly" return to the glide slope, then slightly increase the RPMs to stay on the glide slope. Allegedly, there is safe altitude below you when descending the glide slope, unless otherwise noted on the approach plate. But, in fact, obstructions below you, such as TV towers or tall buildings, can be frighteningly close. So don't tarry when below the glide slope. Pitch control is a quicker reaction than power control.
- Flying a jet vs. a prop plane makes a big difference. In a jet, many seconds can elapse between the time that you advance the throttles and a noticeable power increase (or decrease) occurs. A prop plane, on the other hand, responds much more quickly to throttle adjustments. So, when flying a jet, track the glide slope with the yoke, or pitch control, because you want immediate response.
Things happen so much more quickly in a jet. In the early days of jet travel, a jet crashed on an ILS approach. The pilot, with a gazillion hours in propliners, did the natural thing, and advanced the throttles when he started to drift below the glide path. By the time the engines responded, some ten or fifteen seconds later in those days, he was scraping the ground.
- So bottom line:
- In prop planes, throttle to control rate of descent. If high, slightly decrease the throttle.
- When below the glide path, responsively return to the glide path with the yoke, then slightly readjust power to stay there.
- In jets, because events occur so swiftly, pitch control to maintain the glide slope.
VASI Approaches
Let's fly some VASI approaches. Here are six which will help your glide slope work.
| City | Rwy |
Set This Head Wind |
Intercept Alt. |
Hdg |
Loc. MHz. |
Type | RPM | |
| 1. |
Schnectady KSCH |
4 | – – | 2010 | 040° | 109.7 | VASI | |
| 2. |
Providence KPVD |
23L | – – | 1930 | 227° | 109.3 | VASI | |
| 3. |
Worcester KORH |
29 |
305° @ 15 kts. |
2920 | 289° | 110.9 | VASI | |
| 4. |
White Plains KHPN |
16 | – – | 2050 | 162° | 109.7 | PAPI | |
| 5. |
Boston KBOS |
4R | – – | 1720 | 036° | 110.3 | PAPI | |
| 6. |
Keene KEEN |
2 |
035° @ 20 kts. |
2590 | 018° | 108.9 | PAPI |
PAPI: VASI, but a notch better
Actually, only three of the approaches in front of you rely on the VASI; the other three use the PAPI. PAPI, the Precision Approach Path Indicator, as its name implies, vertically guides you to the runway with a narrower beam of light, thus more precisely. Here is the PAPI in pictorial form.
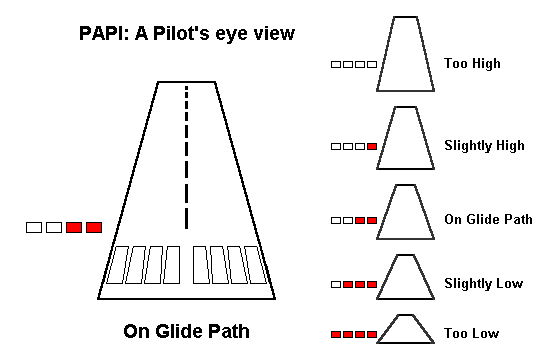
The familiar red and white lights have the same meaning as with the VASI, but the PAPI places them side-by-side rather than front-to-back.
Since the PAPI systems uses a narrower beam of light you must fly the glide path more precisely than the VASI to stay on the beam. You really have to stay on your toes when flying the VASI because there is no indication that you are drifting off the glide path until the lights switch to red-red or white-white. You may find yourself flying an S-slope down to the runway: bump the white-white, descend and bump the red-red, climb and bump the white-white, etc.
The PAPI, with its extra lights, forewarns you when you are drifting from the desired glide path. If you see three reds or three whites, slightly off the glide path, it's time to take the necessary action to stop the drift. Minor power adjustments should do it and knowing the correct RPM for the desired rate of descent puts you a jump ahead of the game, where the lights are determined that you shan't stay between them. It's actually rather fun. You feel as if you've beaten the system when you slide all the way down the glide path with the PAPI lights properly remaining white-white-red-red.
The approaches that you will fly begin 4.0 NM before reaching the FAF. This provides a little over 3 minutes to Ident the localizer and to stabilize the aircraft in straight and level flight on the localizer heading. All speeds are 75 kts., with one notch of flaps dropped.
The intercept altitudes shown are taken from the approach plates for an ILS approach to the same runway. They are your expected altitudes as you cross the Outer Marker. These altitudes will differ from the approach altitudes shown on your approach plates. The intent here is to descend using the VASI rather than fly a full approach.
Intercept the descent path when the Outer Marker sounds, dashed tones, and a blue indicator light illuminating on the instrument panel. In most instances, the VASI lights will not be visible from the Outer Marker in Flight Simulator. Don't worry, start the planned descent at the Outer Marker. The VASI will pop into view very shortly.
Note the RPM column at the end of the table. Record the engine RPM here for each flight after you have achieved a stabilized descent down the glide path. The point is to learn what engine RPM provides the proper rate of descent for your aircraft in the approach configuration of 75 kts., and one notch of flaps lowered. Then when you fly the full ILS you reduce your engine power to this RPM setting when intercepting the glide path.
To minimize porpoising, smoothly reduce the RPMs when throttling back to descend. The digital tach readout allows you to precisely set the desired RPMs.
Point of View
The Flight Simulator program has a tab position to change your point of view of what is in front of the windshield. The system defaults at 1.00, but many pilots who fly in "real time" feel that a value of 1.5, which magnifies the view, is more realistic. Their rationale is that it is equivalent to focusing your eyes on a specific target, such as a runway, vs. taking in the broader picture like viewing mountains.
I prefer the 1.5 view, but it is a subjective thing. Try both then, for all flights, stick with the one that you like best. The VASI lights are definitely easier to see in the 1.5 view mode. Alt View/Options then enter zoom.
Here are the steps for the VASI approaches.
- Turn off Autopilot—this is important. Aircraft may crash trying to return to settings previously saved by the autopilot.
- Set Zoom to 1.50 ... View/Options.
- Go to the "World/Weather" page in FS to set the weather conditions: Click the "Clear All Weather" button.
- Get your C182 Nav Trainer airborne from any airport, and then trim it out to 75 kts. straight and level, with one notch of flaps set in. Headings and altitudes don't matter now because you will set them in later for each approach.
- Set the Nav-2 to the localizer frequency shown in the table, and set the VOR-2 OBS to the heading in the table.
- If a head wind is indicated in the table, go to "World/Weather" and set in the appropriate wind numbers.
- Note that the actual headwind that your aircraft encounters will be 15º to the left of the numbers in the table.
- Go to "World/Map View" to set in your latitude and longitude, heading and altitude information for each approach.
- Save the FS Program, marking it as your default so that it will return to these conditions the next time you open FS.
- Start planned descent rate (based on ground speed) at the OM even if VASI/PAPI lights are not yet visible. Descend at 400 fpm for 75 kts ground speed.
- Fly and enjoy! Don't let the red-over-white VASI indication slip away.
- Trim for 75 kts., if necessary, with the digital elevator trim.
- Scan all flight instruments during the descent; don't let the airspeed wander from 75 kts.
- Pay close attention to the RPMs, keeping them where they belong.
- Press "Shift-Enter" to raise view of ground, if needed and "Shift-Backspace" to lower view.
- Record the engine RPM in the table for the stabilized descent down the glide path.
- To repeat a flight, press "Ctrl – ;" to return to its beginning point.
Flying the Glide Slope
You're now ready to fly the glide slope. The glide-slope needle flies identically to the localizer needle; no adjustments on the gauge affects the needle position. You fly towards the needle to correct for an off-course indication. The illustrations below show the three possible vertical situations when flying the glide path to Providence, R.I., KPVD, Rwy 5.
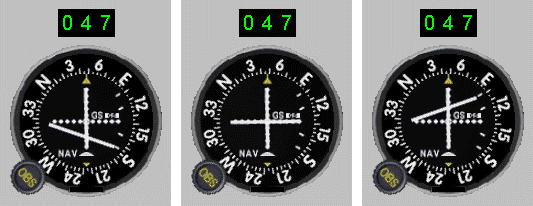
On the left, glide-slope needle is low, you are above the glide-path and must fly down, toward the needle to return. In the center, both needles are centered, aircraft is on glide path and localizer – your approach is perfect. On the right, glide-slope needle is high, you are below the glide-path and must fly up, toward the needle to return.
The deviation of the glide-slope needles is exaggerated in the illustrations. Don't let them get that far off of center. Like the Localizer needle, react promptly when you see needle movement away from center. The object is to stop the needle movement. Don't fret for the moment that you might be a needle-width off of center. Get the needle stopped, by adjusting power. Once you're satisfied that the needle is stopped, then make a tiny power correction to return the needle to center.
Think small when flying the glide slope. All adjustments should be small. Some pilots advocate a jog of the yoke to return the aircraft to the glide slope but this is likely to mess up the stability that you've worked so hard to establish. Try to adjust only with the throttle.
Six Glide Slope flights
Guess what? You're going to repeat the six flights that you just completed with the VASI/PAPI, but flying the glide slope needle.
The table below summarizes these flights and flight conditions.
| City | Rwy | TDZE | Head Wind | Alt. | Hdg | LOC | Ident |
Vis. mi. |
Ceiling ft. |
DH | |
| 1. |
Schnectady KSCH |
4 | 338 | – – | 2500 | 040° | 109.7 | I-SCH | 3/4 | 650 | 555 |
| 2. |
Providence KPVD |
23L | 51 | – – | 2100 | 227° | 109.3 | I-ARJ | 1/2 | 350 | 251 |
| 3. |
Worcester KORH |
29 | 991 | 290° @ 15 kts. | 3000 | 289° | 110.9 | I-EKW | 3/4 | 1300 | 1191 |
| 4. |
White Plains KHPN |
16 | 439 | – – | 2100 | 162° | 109.7 | I-HPN | 1/2 | 750 | 639 |
| 5. |
Boston KBOS |
4R | 18 | – – | 1800 | 036° | 110.3 | I-BOS | 1/2 | 320 | 218 |
| 6. |
Keene KEEN |
2 | 488 | 020° @ 20 kts. | 2600 | 018° | 108.9 | I-EEN | 1 | 920 | 823 |
Here are the steps for the Glide Slope approaches.
- Click here to print the full Glide Slope approach information for use while flying. The printed version is necessary. It contains all of the information in the table above plus the FS setup information needed for each flight.
- Click here to download the zip file with the six approach plates needed for the flights. They are 300 dpi GIF files; print with one-inch margins and the size will be accurate. Approach Plates for Glide Slope flights.
- Turn off Autopilot—this is important. Aircraft may crash trying to return to settings previously saved by the autopilot.
- Go to "World/Weather" to set the weather conditions to the ceilings and visibilities shown in the table. Set the cloud tops at 10,000 ft. If a head wind is indicated in the table, enter that data while there, too.
- Get your C182 Nav Trainer airborne from any airport, and then trim it out to 75 kts. straight and level, with one notch of flaps set in.
- Set the Nav-1 receiver to the localizer frequency shown in the table, and set the VOR-1 OBS to the heading in the table.
- Go to "World/Map View" to set in your latitude and longitude, heading and altitude information for each approach.
- Save the FS Program, marking it as your default so that it will return to these conditions the next time you open FS.
- Begin your descent when the glide slope needle centers. Use the RPMs established from the VASI flights for descent.
- Fly and enjoy! Don't let the glide-slope needle slip away, but don't chase it, either.
- Trim for 75 kts., if necessary, with the digital elevator trim.
- Scan all flight instruments during the descent; don't let the airspeed wander from 75 kts.
- Pay close attention to the RPMs, keeping them where they belong.
- To repeat a flight, press "Ctrl ;" to return to its beginning point.
This is the end of flying the glide slope. We're at the point that most flight-sim pilots were waiting for: the full ILS approaches. Well, all you have to do is click the ILS Approaches button below to get there.
Site best viewed at 600 × 800 resolution or higher.
© 1999 – 2002, Charles Wood.

